Introduction
In Printer's Apprentice, a font group is simply a folder containing one
or more fonts that can be can all be installed or uninstalled
together as needed. Font groups allow you to swap batches of fonts in and out of
Windows memory when you need to jump from project
to project.
Font groups also allow you to organize your font collection in a manner that helps you locate
your uninstalled fonts quickly.
For example, you might have your fonts organized by project or client. Before you start working on the documents for
Sample Client that use these fonts, you would install the entire Sample Client font group. When you
are finished working on that project, you would then uninstall the Sample Client font group.
Font Groups Location
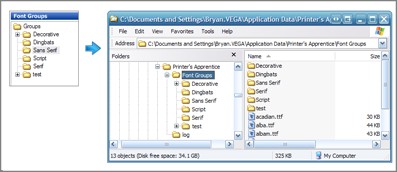
By default, the Font Groups folder structure is located in a folder
in your Application Data area. But Printer's Apprentice only shows the
main folder itself in the Font Groups tab. Other folders from your hard
drive are not displayed. The diagram below shows the relationship
between the Font Groups list in Printer's Apprentice and its actual
location on your hard drive.
c:\documents and settings\user name\Application Data\Printer's Apprentice\Font Groups
Fonts in the group folders are simply files in a folder. The fonts
are not compressed into ZIP files and Printer's Apprentice does not
maintain a database or track any information about the fonts. This
allows you to manage the font groups inside Printer's Apprentice, with
Windows Explorer or with any other file manager.
You can easily change the font groups location from the default to another drive or folder.
To change the location of the Font Groups folder
- Click the Font Groups tab in the main Printer's Apprentice window.
- Select Options from the Tools menu.
- Click the Font Files tab.
- Click the Select Folder button.
- Use the Browse For Folder dialog box to select the new location for your font groups.
- Click the OK button to save your changes and return to Printer's Apprentice.
- The Font Groups tree will be refreshed to select the new location.
Please note: If you change the font groups location in the Options dialog, your font groups are not
automatically copied to the new folder. You will need to manually copy them using Windows Explorer if desired.
Creating Font Groups
To create a new font group
- In the Font Groups tab, right click the top Group node in the tree view.
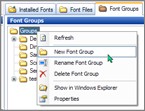
- On the popup menu, select New Font Group.
- A "New Group" node will be added to the Groups tree. Rename the
group as desired and press the enter key. Your new font group is now
ready for new fonts!
Adding Fonts To a Group
Fonts can be added to a group from any of the three
font location tabs -
Installed Fonts, Font Files and Font Groups.
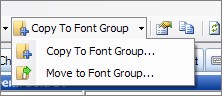
To add fonts to a group, select one or more fonts and click Copy to Font
Group on the Toolbar.
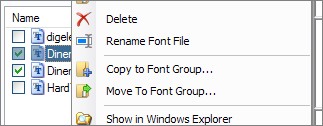
You can also right click the fonts and select Copy to Font Group from
the popup menu.
For the purpose of this section of the documentation, we will use the
"Copy" function. The "Move to Font Group" fuunction uses the same dialog
box to select a destination font group. But the font files are moved
from their original location to the selected Font Group rather than
copied.
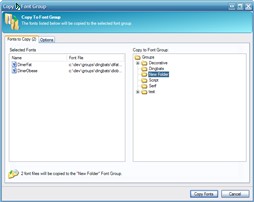
The Copy to Font Group dialog box is then displayed. The font files
to Copy are on the left side of the screen. The destination font group
is on the right. Select a font group and click the "Copy Fonts" button.
Printer's Apprentice displays a progress bar as the fonts are copied
from the source folder into the font group folder.
Now remember, font groups are simply a set of folders in a given location on your hard drive. For example, you decide to copy four font
files from c:\temp to the "Dingbats" group.
If you wanted to see the font groups in Windows, you would use Explorer
to navigate to c:\documents and settings\username\application
data\Printer's Apprentice\Font Groups. Then open the "Dingbats" folder.
You can also use the Explore Font Groups Folder item on the Options menu
to quickly open this folder.
Removing Fonts From a Group
To delete a font from a group, right click it and select Delete from the
popup menu. You can also use the Move the font to another font group or
folder. Deleting the file using Windows Explorer will also remove the
font from the group.
Installing and Uninstalling Font Groups
Font groups make it easy to install and uninstall batches of fonts as
you move from project to project (or your taste in fonts change!).
To install a font group
- In the Font Groups tab, right click any font in the group and click
Install All Fonts In Font Group.
- The Install Font Group dialog will open. Click the Install Fonts
button.
- A confirmation message will show you how many fonts from the group
were installed. And the icons for the fonts in the group will change to
the Windows flag
 to show that
they are installed.
And if you click over to the Installed Fonts tab, the fonts from the
group will be listed there.
to show that
they are installed.
And if you click over to the Installed Fonts tab, the fonts from the
group will be listed there.
When fonts are installed from a group, they are added to the Windows
Registry and automatically copied
from the Groups folder on your hard drive to the c:\windows\fonts
folder.
To uninstall a font group
- In the Font Groups tab, right click any font in the group and click
Uninstall All Fonts In Font Group.
- The Uninstall Font Group dialog will open. Click the Uninstall Fonts
button.
- A confirmation message will show you how many fonts from the group
were uninstalled. And the icons for the fonts in the group will change to
the appropriate font icon


 to show that
they are uninstalled. And if you click over to the Installed Fonts tab,
the fonts from the group will no longer be listed.
to show that
they are uninstalled. And if you click over to the Installed Fonts tab,
the fonts from the group will no longer be listed.
When fonts are uninstalled from a group, they are removed from the
Windows Registry and deleted from the c:\windows\fonts folder. The
original font is still located in your Font Groups folder.
How Do Font Groups Work?
As mentioned above, font groups are simply folders containing uncompressed font files in a set directory
on your hard drive. There is no database or other mechanism that will get in the way of using Windows
or other file management utilities to move font files around.
When fonts from a group are installed, they are copied to the system font folder (c:\windows\fonts),
written to the Registry and added to Windows memory with an AddFontResource() call. The original font
files remain in your Font Groups folder hierarchy.
When you uninstall fonts from a group, Printer's Apprentice deletes the files from c:\windows\fonts,
removes the Registry entry and issues a RemoveFontResource() call. The original font
files are still in your Font Groups folder hierarchy.