Introduction
Using Printer's Apprentice to install fonts is easier than the Windows Control Panel. Printer's Apprentice lets you
browse your drives and preview the fonts before installing them. This is very helpful when you are searching through
a stack of CDs for a particular style of font for a project.
Browsing the File System
To start installing fonts, you first need to locate them on your computer. The Font Files tab uses a drive & folder
tree for navigating your PC. This is very similar to the one used by Windows Explorer.
When you click on a folder, Printer's Apprentice will read all the
TrueType, OpenType and Adobe Type 1 fonts located in that folder. If the
folder contains many files, then a status window may open showing you
the progress of the read operation. The fonts in the folder are listed
below the folder tree.
To look at a font, simply click on the font name. The font will then
appear on the right under the Font
Viewing Tabs.
Please note: Adobe Type 1 fonts
have two files, a PFM and a PFB file. To preview and install Adobe Type
1 fonts, the PFM and PFB files need to be located in the same folder.
Installing Your Fonts
After you locate one or more fonts to install, select them by clicking
the checkbox next to each font. Then select Install Fonts from the
File menu. You can also click the
Install Fonts button on the Toolbar.
The Install Fonts dialog box will open and list the fonts to be
installed.
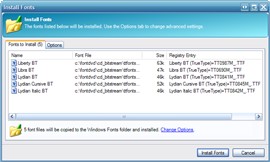
The Install Fonts dialog has two tabs. The "Fonts To Install" tab lists
the selected font names, the source font file, the file size and the
entry that will be added to the Windows Registry. (The Fonts section of
the Registry tells which fonts should be installed the next time Windows
is restarted.) A summary of the install operation is also displayed
below the font list.
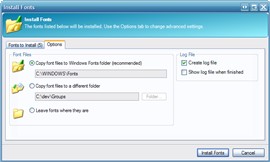
The Options tab lets you specify where the fonts will be copied to
before they are are installed. Each of the settings is described below.
Copy font files to the Windows Fonts folder - Printer's
Apprentice will copy your fonts to the Windows Fonts folder, then
install the fonts. This folder is typically c:\windows\fonts. This option is recommended
and mimics how the Windows Fonts Control panel works.
Copy font files to a different folder - Printer's
Apprentice will copy your fonts to a folder you specify, then install
the fonts. You might want to use this option if you like to keep all the
graphics and fonts for a particular project together in one folder.
For example, perhaps you have a project named "SummerNewsletter" stored
in c:\documents\summernewsletter and you want to make sure that the
fonts used for the newsletter are stored with the project in that
folder. So you click the Folder... button and select the project folder.
Printer's Apprentice will copy the fonts to that folder, then install
the fonts. They are now ready to be used with the project.
Leave fonts where they are - When this option is
selected, Printer's Apprentice will not copy the font files. They will
simply be installed. You might use this option if your fonts are already
organized into folders by project (or some other method).
If the source folder is removable media such as a CD or flash drive,
this option is not recommended.
If you change one of the font destination options, the Registry entry
column on the Fonts To Install tab will change to reflect this.
The Options tab also has checkboxes to "Create a log file" and "Show
log file when finished". If Printer's Apprentice is having difficulty
installing fonts, these may be used to help diagnose the problem. When
the "Create log file" option is enabled, Printer's Apprentice will
create a very detailed list of the actions taken to install the fonts.
This can then be sent to the software developer for analysis. The log
files are stored in the c:\documents and settings\username\Application
Data\Printer's Apprentice\log folder. You can browse this folder by
selecting Printer's Apprentice Log Folder from the Help menu.
When you are satisfied with the options (there are not many options
to set!), click the Install Fonts button. Printer's Apprentice will copy
the font files if necessary and install the fonts. The new fonts will be
listed on the Installed Fonts
tab in Printer's Apprentice. They will also be available for use in
your Windows applications.
Behind the Scenes
After you click the Install Fonts button, Printer's Apprentice runs
through the steps needed to make the font available to Windows and other
applications. The steps are essentially the same as those performed by
the Windows Control Panel Fonts tool. But Printer's Apprentice provides
more tools to make selecting the fonts easier.
Here is what happens after you click the Install Fonts buttons.
- If either of the "Copy font files" options are selected, then
Printer's Apprentice copies the file to the destination folder.
There is, of course, code in place to confirm file overwrites, check
for copy failure, etc.
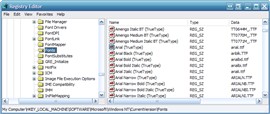
- Printer's Apprentice then adds the font to the Windows Registry.
The Registry entries tell Windows what fonts should be installed the
next time Windows boots up. The font lists are stored in the
following sections:
TrueType and OpenType Fonts
HKEY_LOCAL_MACHINE\SOFTWARE\Microsoft\Windows NT\CurrentVersion\Fonts
(shown below)
Type One Fonts
HKEY_LOCAL_MACHINE\SOFTWARE\Microsoft\Windows NT\CurrentVersion\Type 1 Installer\Type 1 Fonts
Each font is stored in a separate key. The "name" portion of the key
stores the font name and the data portion stores the font file name.
If the font file is located in the c:\windows\fonts folder, then the
filename is stored without a path. If the font file is located in
another folder, then the filename will contain the full path to the
font file.
- Finally, the font file is actually "installed" into Windows
through a call to the Win32 API AddFontResource() function.
Additionally, a WM_FONTCHANGE message is sent to other open
applications to let them know that a new font is available. It is up
to the applications to then do what they need to do to make that
font available. For example, they might call the EnumFontFamilies()
function to refresh the font list in their user interface.